There they were, just sitting on the side of the road, deemed worthless by someone else. But “one man’s trash is another man’s treasure,” right?? And you better believe that I definitely consider eight antique window frames to be treasure!! You heard me right… someone had tossed out (like yesterday’s old cornbread!!) EIGHT beautiful, antique window frames!!
So I looked all around to make sure I wasn’t being watched, loaded them into my minivan, and drove my pile of treasure home. The possibilities of what to do with such a treasure trove instantly flooded my mind. Should I go with the “Shabby Chic” look and repaint and distress them? What about turning them into a creative coffee table? Or hanging them as gardening décor outside?
After a few days of deliberating (including a few hours on Pinterest), I finally decided on what I wanted to do with my gorgeous window frames – which you can also have a peek at these guys and hire them if needed. My decision was motivated by the large amount of blank wall space in our master bedroom that I have been dying to fill with something unique. I want something new that will create an aesthetic look, and by visiting this website, https://bestaluminiumwindows.co.uk/, I found out the best window.
So now I am going to share with you how I turned old window frames into a pretty and creative way to display pictures! 🙂
Before you begin, you must assess the quality of your frames. You can also consider hiring Maverick Windows in Dallas if needed. Even though mine were quite old (from the 40’s), they were in great condition and even had all of the original glass in tact! However, the paint was peeling badly, and the caulking around the glass was brittle and falling off. Now to get to work…
Step One
Set up some sawhorses outside to work on, and begin the tedious step of scraping and peeling. All of the paint must come off, along with the caulking that surrounds the glass. I used a traditional scraper to get the paint off, but for the caulk, I found that prying it loose with a flat-head screwdriver worked best.
Step Two
CAREFULLY remove all of the old glass. Once you have removed all of the caulking, the glass panes should pry out fairly easily. There were a few panes, however, that were wedged in really tight. I actually had to shatter those particular panes and pull out the shards one at a time. (This included about six Band-Aids.) Also, remove any unnecessary hardware from the frame.
Step Three
Sand, sand, sand!!! Using either a hand-sander or some sandpaper, make sure that every paint chip and splinter are smoothed down. You want to have a perfectly smooth, even surface to paint on. You should be able to run your hand along the wood and have no fear of getting a splinter.
Step Four
Paint! (the fun part!!) I chose to paint mine in a high-gloss creamy white. I believe I did three coats, letting it dry completely in between each coat. Keep in mind that if you are planning on distressing your window frame, you need to paint a bottom coat color (the color that you want to show through) before you paint the topcoat color. After you have finished painting and it is entirely dry, you can do some distressing if you wish…I chose to not distress mine. Here is a good link on how to accomplish a pretty, distressed look:
http://www.ehow.com/how_12066095_make-window-frame-look-distressed.html
Step Four
Using a staple gun, attach twine along the back of the frame, so that it is about an inch from the top of the panes. Do this for each row of panes. I pulled my twine fairly taut, so that the weight of the photographs wouldn’t make the twine droop too much.
Step Five
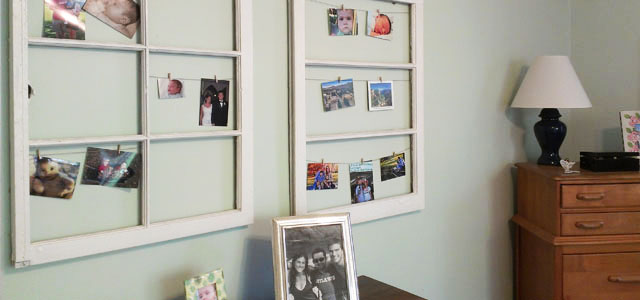
Hang your pictures on the twine! I found the most adorable, tiny clothespins at Hobby Lobby. They are maybe an inch long, and are perfect for hanging photos on string. I hung two to three pictures in a few panes, and I also chose to leave a few panes blank.
Step Six
Mount your “picture frame” on the wall. For my master bedroom, I hung two side-by-side above our dresser. They look absolutely beautiful! I also hung two in our guest room, and instead of hanging family photos on the twine, I pinned on some of Rudy and Mark’s drawings and crafts. 🙂
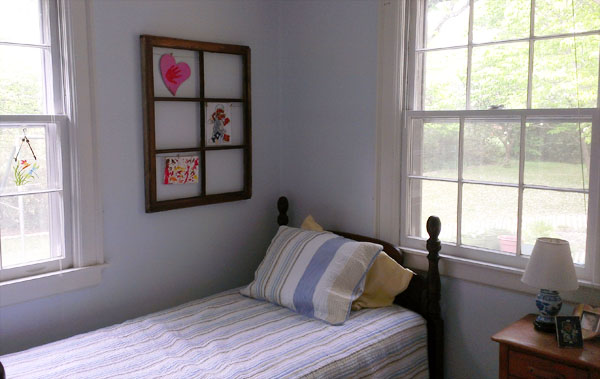
I decided to hang Rudy and Mark’s crafts inside this frame. I also stained it instead of painting it.
I know there are so many creative ideas to use old window frames. Seeing as I still have a few left to work with, I would love to hear some of your ideas! Please share any creative and unique ways that you have turned window frames into something pretty!
Frank McConnell
April 19, 2013 at 1:43 pm (11 years ago)WHAT INTERESTS ME IS THE EASE OF CHANGING PICTURES IN THE WINDOW FRAMES ACTUALLY ENCOURAGES ONE TO KEEP PICTURES UPDATED. COOL IDEA, NOT TO MENTION THE ARTISTIC VALUE. MAKES ME WANT TO JUMP UP AND GO JUNK SHOPPING RIGHT NOW.
Boyd Johnson
April 19, 2013 at 8:47 pm (11 years ago)I am so happy you found my window frames…I have looked all over for them. Glad to see you put them to some good use.
Lauren Souers
April 21, 2013 at 2:48 pm (11 years ago)Haha…too funny!! 🙂
Greg Sureseal
September 12, 2021 at 7:07 am (3 years ago)Old window frames can be helpful in many different ways, and I know most of these ways now. I am thankful to the person who has written this article here. This was useful for me.